
Implementing user login with Twitter is a bit complicated because it requires a number of steps to authentication. In this article, you will learn one of the few available solutions that will definitely work.
How to get a Twitter App, API Key and Secret Key
If you do not already have one, the first thing you need to do is apply here for a Twitter Developer account. While you wait for your request to be approved and granted, you can log into Twitter and make sure you add your mobile number to your Account information by clicking on this link.
When you click the approval link from Twitter, give a name to your App and get the keys.

Skip to your dashboard. Copy all the keys and keep them safe as you will be needing them later. They are also known as your Consumer Keys.

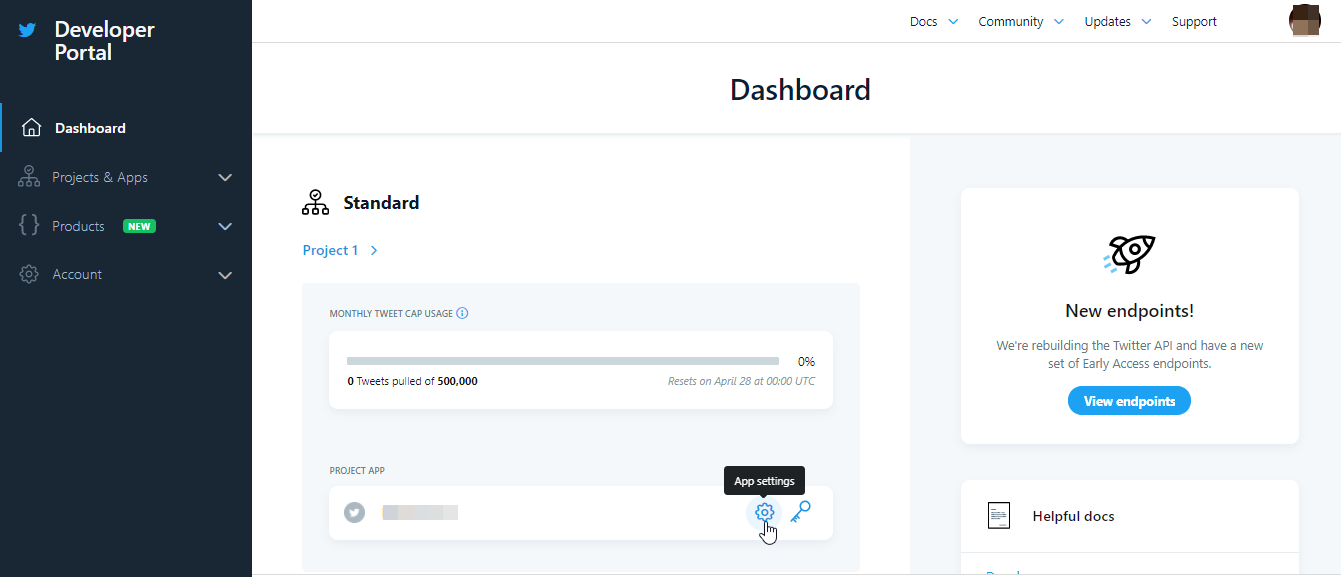
Locate your Project App settings on the dashboard.
Edit App Details to add a description, while in App permissions, choose either Read and Write or Read + Write + Direct Messages.
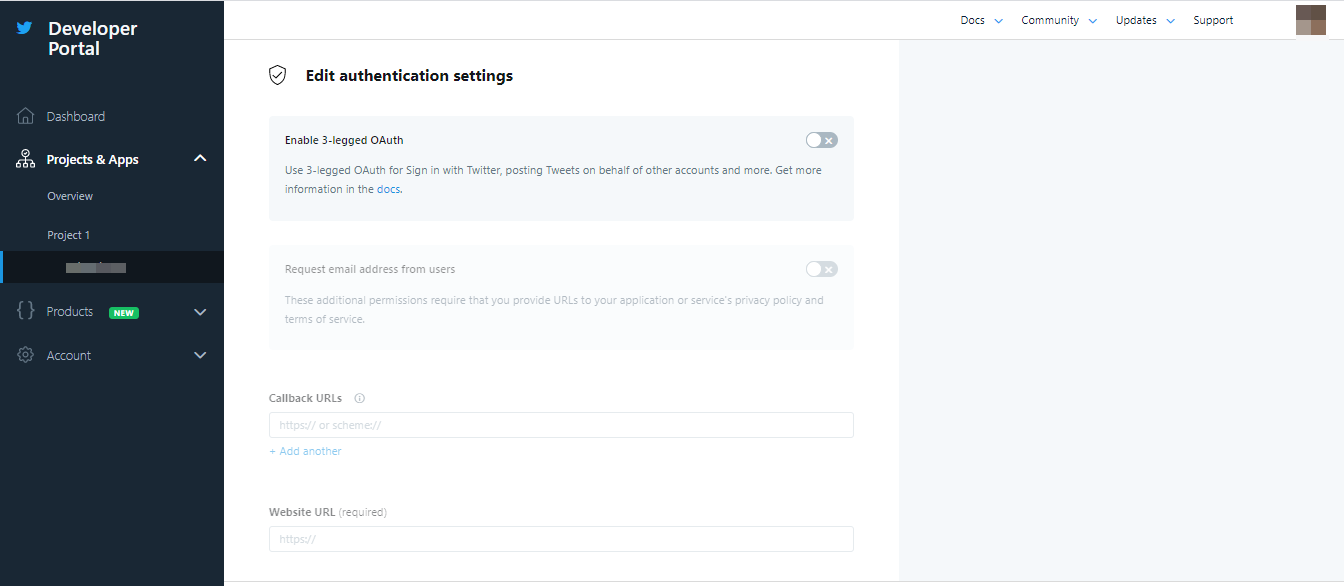
Edit Authentication settings by switching on Enable 3-legged OAuth and Request email address from users. You are also mandated to provide a Website URL, a Callback URL, a Terms of serviceURL and a Privacy policy URL.
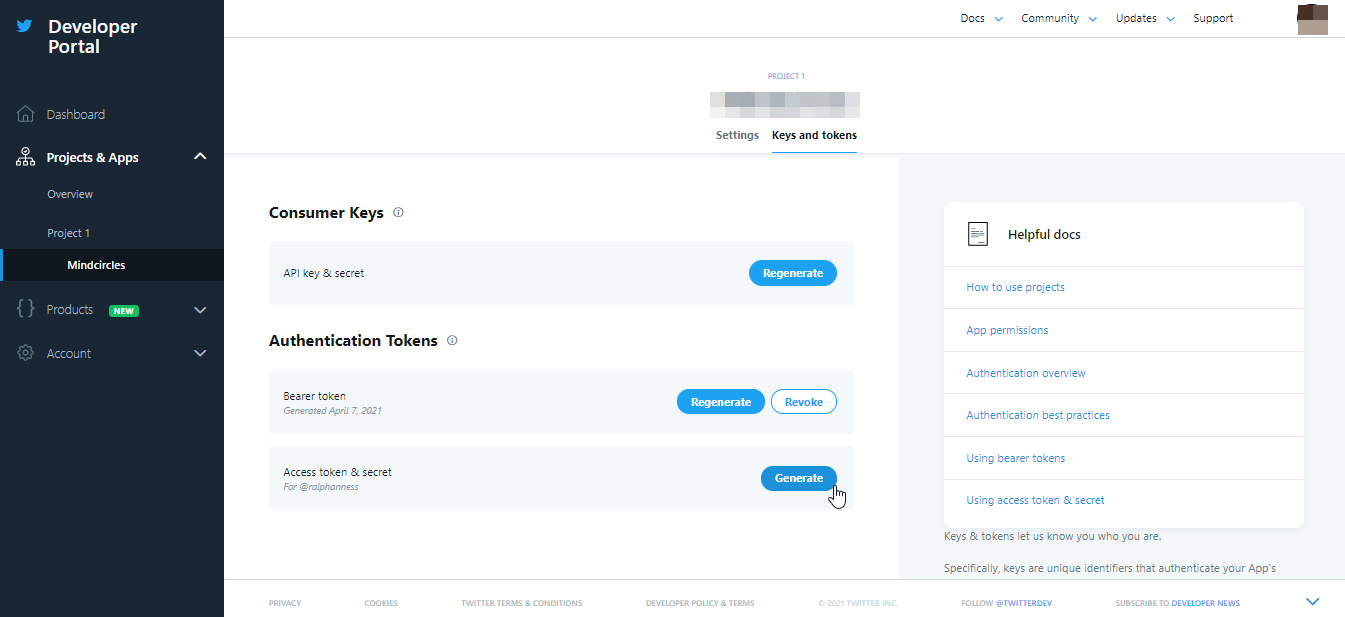
Finally, switch to Keys and Tokens. Click the Generate button for Access token and secret. These are important because every login request will have to call up these tokens. At this point, you have a set of Consumer Keys and a set of Authentication Tokens.
The Project Directory
Just like we did in the first two parts of our social media login series, create a root directory and name it twitterlogin. Right inside the same directory, create two new folders and respectively name them twitter and twitter-api.
Still in the root directory of your application, create the following files:
A config.php
B index.php
C loginform.php
D logout.php
E errorpage.php
F twitteroauthcallback.php
On your terminal, change directory(cd) into the twitter folder and run the command below;
$ composer require abraham/twitteroauth
The command would have downloaded the Twitter API containing a vendor folder, a composer.json file and a composer.lock file.
Create a Database
Using your MySQL console, run the following commands to create a database(social_system) and a table(twitter_users);
/** MySQL console*/
create database social_systems;
use social_systems;

create table twitter_users (
  id int(11) not null auto_increment,
  twitter_id varchar(150) not null,
  name varchar(50) not null,
  email varchar(50) not null,
  profile_image text not null,
  primary key (id),
  unique key twitter_id (twitter_id)
);
App Configuration
In the config.php, we’ll provide configuration values for the database and the Twitter API.
config.php
<?php
/*
 * Basic Site Settings and API Configuration
 */

// Database configuration
define('DB_HOST', 'localhost');
define('DB_USERNAME', 'root');
define('DB_PASSWORD', '');
define('DB_NAME', 'social_system');

$conn = mysqli_connect(DB_HOST, DB_USERNAME, DB_PASSWORD, DB_NAME);

// Twitter OAuth configuration
define('TWITTER_CONSUMER_KEY', '8MGOAAJf4UXQ9kBSgCZf28Rbrn');
define('TWITTER_CONSUMER_SECRET', 'L5HdWIvYn4GXFSOLDJceLAXdPmFR3nIvahQViebWXU6Dm1zJSr');
define('TWITTER_REDIRECT_URL', 'http://localhost/twitterlogin/twitteroauthcallback.php');
Replace all constants with your own database configuration, as well as your Twitter consumer and secret keys.
The TWITTER_REDIRECT_URL should be the exact same as the callback URL you have in your project. In this case it needs to be http://localhost/twitterlogin/twitteroauthcallback.php.
Client-facing Code
Copy and paste the next code snippets to the remaining files in the root directory.
index.php
<?php
session_start();

if(isset($_SESSION['twitter_user_id'])) {
  require 'twitter-api/userinfo.php';
} else {
  header('Location: errorpage.php');
  exit();
}
?>
<!DOCTYPE html>
<html>
  <head>
  <meta name="viewport" content="width=device-width, initial-scale=1">
    <style>
      body, html {
        height: 100%;
        margin: 0;
        font-family: Arial, Helvetica, sans-serif;
      }
      .hero-image {
        background-image: linear-gradient(rgba(0, 0, 0, 0.5), rgba(0, 0, 0, 0.5)), url("https://iso.500px.com/wp-content/uploads/2014/07/big-one.jpg");
        height: 50%;
        background-position: center;
        background-repeat: no-repeat;
        background-size: cover;
        position: relative;
      }
      .hero-text {
        text-align: center;
        position: absolute;
        top: 50%;
        left: 50%;
        transform: translate(-50%, -50%);
        color: white;
      }
      .hero-text button {
        border: none;
        outline: 0;
        display: inline-block;
        padding: 10px 25px;
        color: black;
        background-color: #ddd;
        text-align: center;
        cursor: pointer;
      }
      .hero-text button:hover {
        background-color: #555;
        color: white;
      }
      .avatar {
        vertical-align: middle;
        width: 80px;
        height: 80px;
        border-radius: 50%;
      }
    </style>
  </head>
  <body>
    <div class="hero-image">
      <div class="hero-text">
        <h1 style="font-size:50px">I am <?php echo $result_object['name']; ?></h1>

        <?php if(isset($result_object['email'])){ ?>
          <p>My email is <?php echo $result_object['email']; ?></p>
        <?php }?>

        <img src="<?php echo $result_object['profile_image']; ?>" alt="<?php echo $result_object['name']; ?>" class="avatar">
      </div>
    </div>
    <a href="logout.php">Logout..</a>
  </body>
</html>
loginform.php
<?php
session_start();
require 'twitter-api/twitterlogin.php';
?>
<!DOCTYPE html>
<html>
<head>
<meta name="viewport" content="width=device-width, initial-scale=1">
<style>
.btn-group button {
background-color: #ffffff;
border: 1px solid brown;
padding: 10px 24px;
cursor: pointer;
float: left;
}
#google {color: red;}
#facebook {color: blue}
#twitter {color: lightblue}
a {text-decoration: none;}
/* Clear floats (clearfix hack) */
.btn-group:after {
content: "";
clear: both;
display: table;
}
.btn-group button:not(:last-child) {
border-right: none; /* Prevent double borders */
}
/* Add a background color on hover */
.btn-group button:hover {
background-color: seashell;
}
</style>
</head>
<body>
<h2>Social Login Form</var></h2>
<p> </p>
<div class="btn-group">
<?php echo $twitt_button; ?>
</div>
</body>
</html>
logout.php
<?php
// Initialize the session.
session_start();
// Remove user data from session
unset($_SESSION['twitter_user_id']);
session_destroy();
header("Location: loginform.php");
exit();
?>
errorpage.php
<!DOCTYPE html>
<html>
  <head>
    <meta name="viewport" content="width=device-width, initial-scale=1">
  </head>
  <body>
    <h1>An Error Happened!</h1>
    <a href="loginform.php"><var>Return Back</var></a>
  </body>
</html>
Backend/API-facing Code
Within the twitter-api folder, create a file named twitterlogin.php. We’ll begin the code procedure by requiring autoload.php from the twitter API we earlier downloaded and a call to TwitterOAuth.
twitter-api/twitterlogin.php
<?php

require 'twitter/vendor/autoload.php';
require_once 'config.php';

use Abraham\TwitterOAuth\TwitterOAuth;

// Begins
$connectTwitter1 = new TwitterOAuth( TWITTER_CONSUMER_KEY, TWITTER_CONSUMER_SECRET );

// Get a request token
$request_token = $connectTwitter1->oauth( 'oauth/request_token', array( 'oauth_callback' => TWITTER_REDIRECT_URL ) );

$_SESSION['oauth_token'] = $request_token['oauth_token'];
$_SESSION['oauth_token_secret'] = $request_token['oauth_token_secret'];

$connectTwitter2 = new TwitterOAuth( TWITTER_CONSUMER_KEY, TWITTER_CONSUMER_SECRET, $_SESSION['oauth_token'], $_SESSION['oauth_token_secret'] );
$verify_authentication = $connectTwitter2->url( 'oauth/authenticate', array( 'oauth_token' => $request_token['oauth_token'] ) );

// Create a button for the login action
$twitt_button = '<button><a href="'.htmlspecialchars($verify_authentication).'" id="twitter" name="twitter">Login with Twitter</a></button>';
Code Explanation
Request Token
To obtain a request token, you have to create a first instance of the TwitterOAuth class with the TWITTER_CONSUMER_KEY and the TWITTER_CONSUMER_SECRET as the parameters. Obtain the request token with 'oauth/request_token' as recommended by the updated Log in with Twitter guide on Obtaining a Request Token. The request token, which is first of the three legged authentication, is returned with an oauth_token and an oauth_token_secret values. Assign both values to sessions and use them as parameters to create a second instance of the TwitterOAuth class.
Authentication
The next step is to request for user authentication using the second TwitterOAuth instance and the oauth/authenticate. The goal is to verify the redirect URL and obtain an authentication from the user who is requesting a login access. When the redirect is successful, this request returns an oauth_token and an oauth_verifier, which is then used to make the final request in the twitteroauthcallback.php file that we are about to create.. You can learn more about it in Redirecting the User guide.
Access Token
A final leg of the authentication will take place in the code below;
twitteroauthcallback.php
<?php
require 'twitter/vendor/autoload.php';
require 'config.php';

use Abraham\TwitterOAuth\TwitterOAuth;
session_start();

if ( isset( $_GET['oauth_verifier'] ) && isset( $_GET['oauth_token'] ) && isset( $_SESSION['oauth_token'] ) && $_GET['oauth_token'] == $_SESSION['oauth_token'] ) {
  $connectTwitter3 = new TwitterOAuth( TWITTER_CONSUMER_KEY, TWITTER_CONSUMER_SECRET, $_SESSION['oauth_token'], $_SESSION['oauth_token_secret'] );

  $access_token = $connectTwitter3->oauth( 'oauth/access_token', array( 'oauth_verifier' => $_GET['oauth_verifier'] ) );
  $_SESSION['access_twitter'] = $access_token;

  if (isset($_SESSION['access_twitter']) && $_SESSION['access_twitter']) {
    $oauthenticate = $_SESSION['access_twitter']['oauth_token'];
    $oauthenticate_secret = $_SESSION['access_twitter']['oauth_token_secret'];

    // Use the access token session to fetch the oauth_token and oauth_secret_token.
    $verifier = new TwitterOAuth( TWITTER_CONSUMER_KEY, TWITTER_CONSUMER_SECRET, $oauthenticate, $oauthenticate_secret );

    $getUser = $verifier->get( 'account/verify_credentials', ['include_email' => 'true'] );
    if (property_exists($getUser, 'error')) {
      $_SESSION = array();

      // If it's desired to kill the session, also delete the session cookie.
      // Note: This will destroy the session, and not just the session data!
      if (ini_get("session.use_cookies")) {
        $params = session_get_cookie_params();
        setcookie(session_name(), '', time() - 42000,
          $params["path"], $params["domain"],
          $params["secure"], $params["httponly"]
        );
      }
      // Finally, destroy the session.
      session_destroy();
      header('Location: errorpage.php');
      exit();
    } else {
      $getUser = $verifier->get( 'account/verify_credentials', ['include_email' => 'true']);
      $twtID = mysqli_real_escape_string($getUser->user_id);
      $twtname = mysqli_real_scape_string($getUser->name);
      $twtemail = mysqli_real_scape_string($getUser->email);
      $twtimage = mysqli_real_scape_string($getUser->profile_image_url);
      $twtUserQuery = "SELECT `twitter_id` FROM  `twt_users` WHERE twitter_id = '".$twtID."'";
      $result = mysqli_query($conn, $twtUserQuery);

      if (mysqli_num_rows($result) > 0) {
        $updateUser = "UPDATE `twt_users` SET name = '" . $twtname ."' AND email = '" . $twtemail ."' AND profile_image = '" . $twtimage . "'";
        $updated = mysqli_query($conn, $updateUser);
      } else {
        // Add user to the database
        $newUser = "INSERT INTO `twt_users` (`twitter_id`, `name`, `email`, `profile_image`) VALUES('". $this->google_id ."','" . $this->name. "','" . $this->email . "','" . $this->profile_image."')";
        $newUserResult = mysqli_query($newUser);
      }

      $row = mysqli_fetch_assoc($result);
      if ($row) {
        extract($row);
        $_SESSION['twitter_user_id'] = $twitter_id;
        header('location: index.php');
        exit();
      }
    }
  }
}
If the values of oauth_token and oauth_verifier, along with the other tokens are true, then create a third instance of the TwitterOAuth class and request for an access token using 'oauth/access_token'. You can learn more about Converting the Request token to an Access token. Save the access token in a session and use it to make yet another request that will verify and fetch user credentials. Save the credentials to the database.
twitter-api/userinfo.php
<?php
require_once 'dbconfig.php';

$twt_id = $_SESSION['twitter_user_id'];
$user_data = "SELECT * FROM `twt_users` WHERE `twitter_id` = '$twt_id'";
$querydb = mysqli_query($conn, $user_data);
if(mysqli_num_rows($result) > 0) {
  $result_object = mysqli_fetch_assoc($querydb);
}
else {
  header('Location: logout.php');
  exit();
}
The last code snippets queries the database for the user’s information and saves it in $result_object as an associative array.
Conclusion
The Twitter login unlike the previous systems featured in the series is achieved through a procedural execution. I opted out of OOP in the code implementation as every other class tends to interfere with the TwitterOAuth class. It’s something you should probably look into for yourself.